Concrete Pump Pads Constructed Around Water Pumps Prevent Surface Water From Entering the Well and Provide a Safe and Sanitary Surface for Water Collection
Pump pads are an important part of good well construction.
Note: Much of the content on this page has been adapted from publications of Lifewater International, written by Fred Proby.
A concrete pad correctly constructed around the pump area prevents surface water from entering the well.
It provides people using the well with a safe, dry place to stand without getting wet or muddy.
Constructing first-rate pump pads requires some experience in concrete and construction methods.
It may be useful to hire local personnel with such experience in order to achieve the best results.
But, since this may not be an option where you are, some basics of constructing pump pads is included here.

A variety of ways have been developed to make a good pump pad, but here is a general outline of steps required for a good pump pad:
1. Cut off the PVC well casing so it will be about 20 cm (8'') above the top of the finished concrete pad.
2. Center the pump base over the well casing and brace it so that the pump stays vertical while the concrete pad is being poured.
(Make sure the pump spout will be high enough above the top of the concrete so that a bucket or jerry can will fit under it.)
3. Build a form around the pump that will contain the concrete while it sets.
4. Lay steel reinforcing bar or wire mesh in the form and wire the legs of the pump base to the rebar or wire mesh to keep it stable.
Place small rocks under the rebar or wire mesh to raise it about 7 cm (3'') above the soil so the reinforcing will be in the center of the concrete.
5. Mix and pour the concrete, then level it with a board, smooth it with a float, and then finish it with a trowel.
6. Place barriers around the pad and pump so that it cannot be disturbed until the concrete has sufficiently hardened (about a week). Cover the top of the pump base so children can't drop rocks down it.
7. Install the pump cylinder and riser main and attach the pump head and handle after the concrete has hardened.
The main difference between different methods of constructing concrete pump pads lies in the materials used to make the concrete form.
The form defines the shape and thickness of the pad. Wet concrete is very heavy and will exert strong pressure against the sides of the form, so the form must be sturdy. A poorly-made form will result in a bad pump pad.
The three most common form materials are wood, steel, and brick.
The choice of which material to use depends on cost, availability, and local preference.
Concrete forms made with wood or steel can be re-used. Brick forms become a permanent part of the pad.
Wood Form
Making a concrete form out of wood boards is very easy. If the forms are cared for and cleaned after each use, they can be re-used many times.
The face of the boards should be smooth, not rough-cut, so the concrete won't stick to them.
They should be at least 4 cm (1.5") thick and not have any splits or knot holes. The boards should be 15 cm (6'') wide in order to get a slab of the desired thickness.
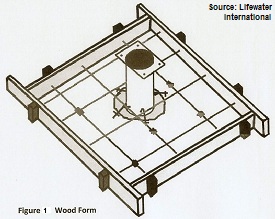
To make a 2 m square pad, two of the boards should be 2 m (6 feet) long and two should be slightly longer, as shown in figure 1.
When constructing a pump pad with a wood form, it is easier to first pour the pad around the pump, remove the form after the concrete has set, and then use the same boards to form a drain channel.
If a curb is to be added, a second set of boards is used to form the curb after the pad concrete has set. Alternately, a curb can be made by laying bricks around the edge of the pad and then covering them with concrete.
Brick Form
If bricks or cement blocks are readily available in the area, they can be used to make a form for the pump pad.
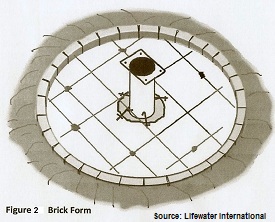
Lay the bricks in a circle with a radius of 1 m (3') centered on the pump base, as shown in Figure 2. (Use a stick tied to a string to mark a good circle.)
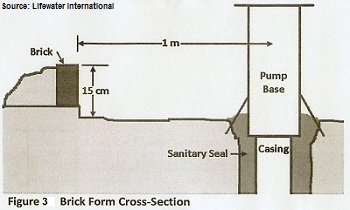
If the bricks are less than 15 cm (6'') high, then it will be necessary to dig the pad area to get a thick enough pad, as shown on Figure 3.
The base for the bricks must be level and smooth or it will be difficult to get the pad level.
Bricks will not be heavy enough to hold back the wet concrete, so dirt must be piled up against the bricks to hold them in place.
An alternative to piling dirt is to tie a strong rope around the circle of bricks.
Lay the rebar or wire mesh (raised with rocks to put it in the center of the concrete), mix and pour the concrete, level and float it, then finish the concrete surface.
After the concrete has started to set, remove the dirt or rope from around the bricks. To make a curb, lay a second course of bricks around the edge on top of the green concrete, and then cover these bricks with a thin layer of concrete.
Use the same procedure to form a drain channel.
Steel Form
The most efficient way to make a pump pad is with a steel form. These are more expensive than wood or brick and may not be available everywhere.
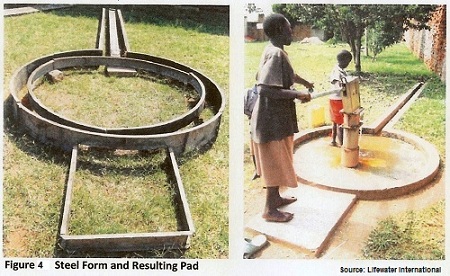
But they will last for many years (if cleaned after each use) and can form the pad, curb, and drain line in a single pour.
Procedures for assembling and using a steel form will vary depending on the form design. The form shown in figure 4 is just one example (the sections of this form have not been connected yet).
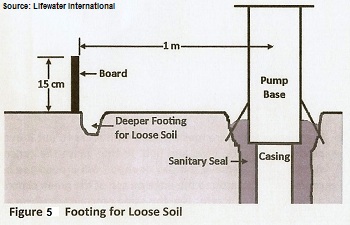
With any of the different concrete forms, the soil around the borehole should be compacted so it does not settle and cause the pad to be undermined.
If the soil is sandy and cannot be compacted, then it may be necessary to make the outer edge of the pad thicker. Figure 5 shows how to do this.
Return to "Introduction to Groundwater" from "Pump Pads"
Return "Home"