Making Concrete for Use in Water Well Construction: The Basics
Making Concrete: The Basics
Note: The content on this page has been adapted from publications of Lifewater International, written by Fred Proby.
Concrete Terminology
On these pages, many words are used which are unique to making concrete. Different words may be used in the area where you work, but the concepts will be the same.
Making oncrete is a common practice throughout the world and it is likely that wherever you are there are experts around that are familiar with concrete work.
It is worthwhile to take some time to go over the words used on these pages and match them to their local meanings.
Form - a frame that holds concrete in the shape that is desired for the finished product.
Screed - a board, normally a little longer than the width of the form, used to level the wet concrete even with the top of the form (also used to mean the process of leveling the concrete).
Float - a small smooth board with a handle that is used to agitate the wet concrete to sink rocks below the surface, eliminate air pockets, bring water up to the surface, and to smooth the concrete (also used to mean the act of ''floating the concrete").
Finish - the final stage of making concrete is adding a surface texture to the concrete. Concrete is most often given a smooth surface using a steel finishing trowel.
But in making concrete it can also be given a rough non-slip surface by brushing it with a broom. Finishing is done in several stages as the concrete begins to set up.
Edge - because the cured concrete will have a sharp edge that can cut bare feet, or crack off, an edging tool is used to make a shallow groove between the concrete and the form. An edging trowel has one edge that curves down to accomplish this.
Stages of concrete curing - Concrete does not "dry". Instead, it gains strength through a chemical reaction called ''curing'' that starts as soon as water is added.
The following stages of curing are useful to understand when making concrete:
Wet - very soft and easily poured or shaped (less than an hour after adding water).
Set - also called ''green'' concrete meaning that it is still slightly soft but will hold its shape when the form is removed (several hours old).
Hardened - can be walked on, but has not reached full strength (about a week old).
Cured - the concrete has reached at least 80% of full strength (at least a month old).
Concrete is made from cement, sand, gravel and water.
In making concrete strong, these ingredients should usually be mixed in a ratio of 1:2:3:0.5 to achieve maximum strength. That is 1 part cement, 2 parts sand, 3 parts gravel, and 0.5 part water. (See figure 6).
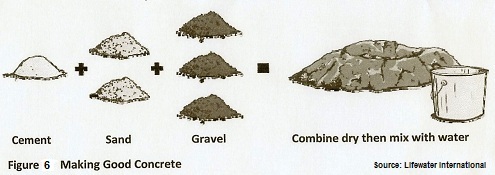
(A ''part'' means a unit of measure. Technically, it should be based on weight but in practical use the unit of measure will be a volume such as a sack, a bucket, or a shovel full.)
* If not enough cement is used, then the result is called ''sandcrete'' and the pad will eventually fall apart.
Sometimes, a different cement:sand:gravel ratio such as 1:2:4 or 1:2:2 is printed on a sack of cement as a guideline for making concrete slabs.
It is best to use the ratio printed on the sack, but if none is given use 1:2:3.
* If there are several grades of cement available, always use the best grade.
Cheap cement does not hold up to heavy use so a pump pad made with cheap cement will soon have to be replaced. So, cheap cement will not save money in the long run.
* Cement must be stored in a dry place. If it is exposed to moisture it will begin to cure. Cement that has hard lumps in it has been exposed to water and should not be used.
* For best results, the sand and gravel should be angular, not rounded or smooth. The gravel should have a maximum diameter of about 2cm (3/4 inch).
* It is very important to use clean sand and gravel when making concrete. Even small amounts of silt, clay, or vegetation will weaken the concrete.
* The amount of water used to mix the ingredients is the most important factor in determining the final strength of the concrete. Use the least amount of water that will still give a workable mix.
Too much water weakens the concrete and leads to cracking.
The 1:0.5 cement:water ratio noted above is merely a guide for estimating when making concrete.
Note: First mix the cement, sand, and gravel THEN slowly add water. It is best to sprinkle the water rather than pour it. The water must be clean and fresh, not salty.
For making concrete in a large volume, as will be needed for a pump pad, a cement trough is a very useful tool.
The trough is approximately 1.2 m wide by 2 m long (4 ft. x 6 ft.) and 30 cm (12 inches) deep. Clean the trough after each use before the concrete sets, or it will become difficult to use and heavy to move.
It takes time for concrete to cure. After a week concrete has gained most of its strength but it takes about a month to cure to full strength.
Therefore, it is very important to let the concrete harden for at least a week before doing anything that will bump or move the pump base.
If work is done on the pump before the concrete hardens, then the bond between the concrete and the metal will be weakened. This might not show up right away, but after time the base can begin to separate from the concrete.
This is a serious problem because it allows contaminated surface water to seep directly into the well.
When installing or repairing a hand pump, NEVER leave a well casing open and unattended!
Children, and even some adults, may drop rocks down it to hear the interesting sound the rocks make as they fall. In this way the well casing can be quickly filled with rocks which will destroy the well.
Therefore, whenever the well is left unattended before the pump installation has been finished, secure the opening in the pump base. Bolting a plate where the pump head will be attached is an effective method.
Calculating Concrete Volume
When making concrete, figuring out how much will be needed for a pump pad requires good measurements, a little math, and experience.
It is not unusual for concrete quantity calculations to result in too much or too little concrete being mixed.
It is better to have a little concrete left over than to have to mix additional concrete to finish the job.
Even when making the same sized pad each time, there will be variations in the amount of concrete needed.
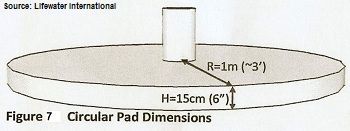
For example, Figure 7 shows a cross-section of a 15 cm (6 inches) thick circular pad with a radius that extends 1 m (3 ft.) from the pump base.
But the area around the pump base is lower and there is a footing dug around the edge of the pad.
The volume of these areas can be difficult to calculate, so it may be necessary to estimate how much addition concrete will be needed above the calculated amount.
A common practice in making concrete is to mix 5% more concrete than calculated from the measurements of the pad.
Circular Pad Volume
The volume of a circular pump pad is calculated using the formula for a cylinder,
V=(Pi)R2H
where V is volume,
(Pi) is 3.14,
R is the radius (distance from the center to the edge), and
H is the height or thickness of the pad.
For a pad with a radius of 1 m (about 3 ft.) and a thickness of 15 cm (6 inches).
The formula would be:
V=(Pi)R2H
V=3.14 x 12 x 0.15 =0.47 cubic meters
Adding 5% to 0.47 cubic meters ((0.47 x 0.05)+0.47) and rounding off gives a concrete volume of 0.5 cubic meters(18 cubic feet).
A cubic meter is 1,000 liters so this pump pad volume is 500 liters.
Square Pad Volume
The volume of a square pump pad is calculated using the formula for a cube:
V=LWH where
V is volume,
L is the length,
W is the width and
H is the height or thickness of the pad.
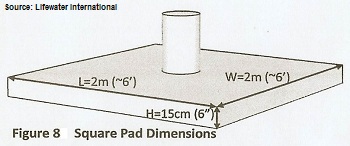
For a pad with a length and width of 2 m (about 6 ft.) and a thickness of 15 cm (6 inches), as in figure 8, the formula would be:
V=LWH
V=2 x 2 x 0.15 = 0.6 cubic meters
Adding 5% to 0.6 cubic meters ((0.6 x 0.05)+0.6) and rounding off gives a concrete volume of 0.65 cubic meters (23 cubic feet) or 650 liters.
In these examples, there is no footing around the edge of the pad. If the pad has one, then its volume would be calculated by multiplying the length, width and depth and adding that result to the pad volume.
The volume of the drainage channel also needs to be calculated and added to the pad volume.
Assuming the channel is 2m long by 0.3m wide and 0.15m thick (6' x 1' x 0.5') gives a volume of 0.09 cubic meters.
Adding 5% gives a drainage channel volume of 95 liters (3 cubic feet).
After the volume of concrete needed has been calculated, the next step is to determine how much cement, sand, gravel, and water is required to make up that volume.
Because the small grains of sand and cement fill in the spaces between the gravel, the final volume of concrete is less than the sum of the individual parts.
Although 1 part cement plus 2 parts sand plus 3 parts gravel plus 0.5 part water adds up to 6.5 parts, the actual volume when the ingredients are mixed together will be about 2/3 of that sum.
This is illustrated in Figure 9.

To show how this works out in practice, start with a 50 kg (110 pound) sack of cement as the unit of measure or "1 part".
This size sack, which is the standard sold in most countries, has a volume of around 33 liters (1.2 cubic feet).
If the cement sack has a different weight, obtain its volume by multiplying the weight of the sack in kilograms by 1.51 kg/liter (or weight in pounds by 94 lb/cubic foot), which is the density of cement powder.
[In the US, a standard sack of cement weighs 94 pounds (43 kg) so it has a volume of 1 cubic foot (28 Liters)].
Mixing one 33 liter (50 kg) sack of cement with 2 sacks of sand , 3 sacks of gravel and 1/2 sack or 16.5 liters of water gives 6.5 sacks.
If each sack has a volume of 33 liters, then 6.5 sacks times 33 liters equals 214.5 liters.
Because the small grains fill the spaces between the gravel, the actual mixed volume will be 2/3 of this.
So 2/3 times 214.5 liters equals 143 liters. In making concrete in this example, we will call this volume (143 liters) a ''batch'' of mixed concrete.
If you start with a different volume of cement as ''1 part'' or use a different ratio of components, then the size of the batch will be different, but the procedure for calculating the end volume of concrete will be the same; the sum of the parts in liters (or cubic feet) times 2/3.
The total concrete volume needed for the circular pad and drainage channel calculated above was 595 liters.
Dividing 595 liters by the volume of one batch (143 liters) gives 4.2 batches of concrete.
It is wise to mix more than is needed, so you would mix 4.5 batches of concrete for this pad and channel.
Making concrete for the curb for this pad would depend on how the curb was made. If the curb was made by coating bricks with cement, then use a ''mortar mix'' of 1:3 cement:sand.
Otherwise, make up a standard cement mix after the form for the pad was removed.
The calculations on these pages are based on volume.
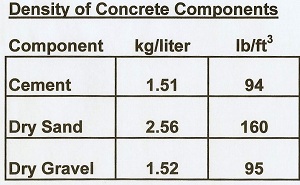
But cement, sand, and gravel are sometimes sold by weight (kilogram or pound) rather than by volume (liter or cubic foot).
To find out what weight of each component to purchase, multiply the total volume of each component by its density (weight per unit volume).
The following table gives the average densities of components used in making concrete.
The circular pad in the example above had a volume of 595 liters which requires 4.5 batches of concrete. The weight of the individual components may be calculated as follows:
Cement: 1 sack (33 liters) x 4.5 batches = 148.5 liters x 1.51 kg/liter = 224 kg
Sand: 2 sacks (2 x 33 liters) x 4.5 batches = 297.0 liters x 2.56 kg/liter = 760 kg
Gravel: 3 sacks (3:33 liters) x 4.5 batches = 445.5 liters x 1.52 kg/liter = 677 kg
Finishing Concrete
The purpose of finishing is to remove air bubbles from the concrete which will weaken it, to push gravel down, to bring water up to aid in curing, and to give the surface an attractive appearance.
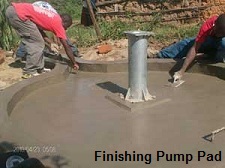
The sequence of the finishing steps and the tools used in the process are as follows:
* Screed,
* Float,
* Finish (trowel), and
* Edging.
It is not difficult to understand the process for making concrete when you see it done, but it takes practice to master.
Finishing concrete is an art.
Once you have finished making concrete and it has begun to set so that it can't easily be dented, the pad must be kept moist for several days in order for the concrete to become strong.
Cover the pad with cloth or grass and frequently sprinkle it with water. It is also helpful to cover it with a sheet of plastic to keep the surface from drying out.
Remember, concrete does not ''dry'' it ''cures'' and the presence of water is necessary for that curing reaction to take place.
The pad should be kept covered like this for at least one week. After that, it can be walked on to install the pump.
A non-profit organization called Cement, Concrete, and Aggregates Australia has published a manual covering the basics of making concrete and working with concrete.
Return to "Introduction to Groundwater" From "Making Concrete"
Return "Home"


IMPROVE SUSTAINABILITY!
INCREASE YOUR IMPACT!
Alleviating Poverty/Advancing Prosperity
An Essential Guide for Helping the Poor

CLICK HERE to learn more about how YOU can create lasting change!


