Privy Pit Design Involves Selecting a Location, Calculating Pit Size, and Determining Labor and Materials Needed
Privy pit design involves selecting the privy location, calculating the pit size, and determining the labor, materials, and tools needed for construction.
The products of the design process are:
(1) a location map,
(2) technical drawings of the privy pit,
(3) sketches or the pit lining (if needed) and base for the slab, and
(4) a materials list.
These products should be given to the construction supervisor before construction begins.
Location
The major factors in selecting a location for a privy are:
(1) location of water supplies, dwellings, and property lines,
(2) soil type,
(3) ground- water levels, and
(4) impermeable layers.
Location of Water Supplies, Dwellings, and Property Lines
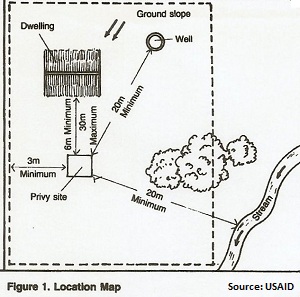
A pit privy should be downhill from water wells. It should be at least: 20 meters from the nearest well or stream, 6 meters from the nearest dwelling, 3 meters from the nearest property line.
For the sake of convenience, the privy should be no farther than 30 meters from the building to be served.
It should be on fairly level ground. When a proposed site has been selected, determine the soil type.
Soil Type, Groundwater Level, and Impermeable Layers
A privy pit should be dug in a location having favorable soil suitability and permeability, so the liquid part of the excreta can soak into the ground.
The bottom of the privy pit must be at least 1 meter above the groundwater level during the wettest season of the year.
This information may be available from local residents, water well owners, or water well drillers. If the information is not available or reliable, field tests must be made.
When a suitable site has been found, draw a location map similar to Figure 1, showing the privy pit site and distances to water supplies, streams, dwellings, property lines, and any other nearby structures or prominent geographical features.
Determining Privy Pit Size
To determine the length, width and depth of a privy pit, first calculate the capacity.
The capacity, or volume, of a pit is determined by the number of users or the latrine, the number of years the pit is expected to last, whether the privy will have a pour-flush bowl, and the type of toilet paper or cleansing material used.
Worksheet A shows a sample calculation of the size or a pit.
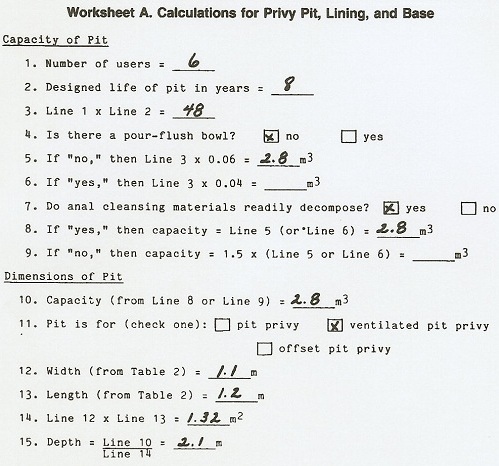
The number of users equals the num- ber of persons living in or using the building to be served (Worksheet A, Line 1).
The privy pit should be designed to last 5 to 10 years, preferably 10 (Worksheet A, Line 2).
If the privy will have a pour-flush bowl, the pit can be smaller because the water used to flush the bowl will cause the excreta in the pit to decompose more rapidly (Worksheet A, Line 4).
The capacity of the privy pit is calculated as follows: For a pit without a pour-flush: number of persons times number of years times 0.06 equals volume in cubic meters (Worksheet A, Line 5).
For a privy pit with a pour-flush: number of persons times number of years times 0.04 equals volume in cubic meters (Worksheet A, Line 6).
Example 1. Suppose a pit privy without a pour-flush is being designed for a family of six and is to last eight years.
Then the capacity of the pit equals:
6 x 8 x 0.06 = 2.8 cubic meters (Worksheet A, Lines 1-5).
Example 2. Suppose a pit privy with a pour-flush is being designed for a family of six for eight years. Then the capacity or the pit equals:
6 x 8 x 0.04 = 1.9 cubic meters (Worksheet A, Lines 1-6).
If toilet paper or cleansing materials that do not readily decompose such as grass, leaves or corncobs are used, the capacity of the pit should be multiplied by 1.5 (worksheet A, Line 7).
For example, if the capacity of the privy pit was calculated to be 3.0 cubic meters and corncobs are the usual cleansing material, the required capacity of the pit is:
3.0 cubic meters x 1.5 = 4.5 cubic meters (Worksheet A, Line 9).
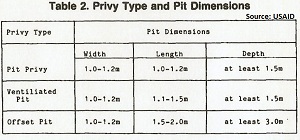
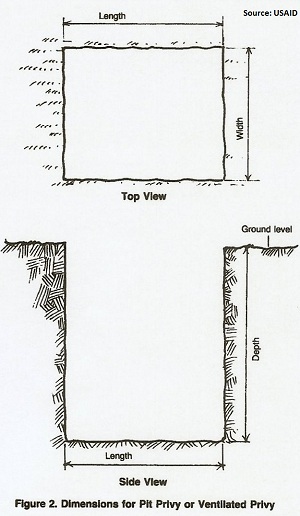
When the capacity has been calculated, determine the dimensions of the privy pit. First, find the length and width. They depend on the type of slab and shelter being used
In general, a pit for a privy is square and is directly beneath the slab and shelter. A pit for a ventilated pit latrine is either slightly offset or slightly longer than it is wide to accommodate the vent pipe.
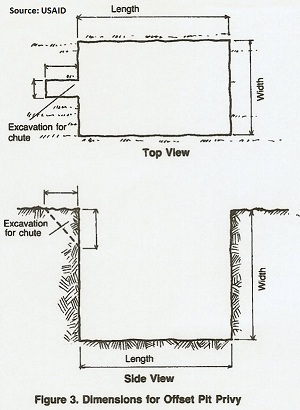
A pit for an offset pit latrine is longer than it is wide and larger than a pit that is not offset.
(NOTE: A pour-flush bowl is generally used with a ventilated pit privy or an offset pit privy.)
Table 2 shows the general width and length and the minimum depth of the privy pit for each type of latrine.
Determine the correct depth by dividing the design capacity by the width times the length (worksheet A, Lines 10-15).
For example, calculate the correct depth of a ventilated latrine with a capacity of 2.8 cubic meters, a width of 1.1 meters, and a length of 1.2 meters.
Depth = 2.8 cubic meters/1.1m x 1.2m
=2.8 cubic meters/1.32m
= 2.1m
For pits 2.5-3.5m deep, add 0.15m to the length and 0.15m to the width to accommodate a step or ledge left in the walls during construction.
For safety reasons, do not design a privy pit to be dug by hand deeper than 3.5m.
When the dimensions of the privy pit have been determined, make a technical drawing similar to Figure 2 showing length, width, and depth.
For an off- set pit latrine, which requires a chute from the squatting slab to the pit, make a drawing similar to Figure 3 showing length, width, and depth of the privy pit, and excavation for the chute.
Give these drawings to the construction supervisor.
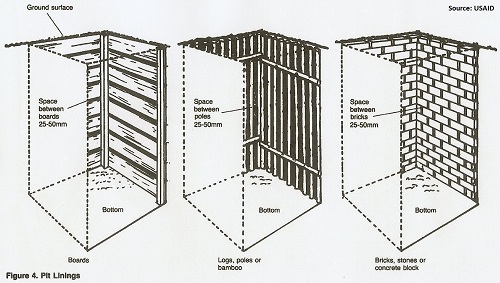
If the soil is such that the walls of the pit will not stand on their own in both wet and dry seasons, the pit must have a lining. All pits need a base to support the slab.
The lining can be made of bamboo, logs, poles, boards, bricks, concrete blocks, or select field stones.
Whatever material is used, it must have slits or open spaces to allow the liquid part of excreta to pass through to the soil.
For an offset pit latrine, a space must be left in the lining to allow for the chute.
Prepare a sketch similar to one of those in Figure 4 showing the lining material.
Also prepare a sketch similar to one of those in Figure 5 showing the materials to be used for the base, and give both of them to the construction supervisor.
Materials List
Prepare a materials list showing labor requirements, types and quantities of materials and tools, and the estimated funds needed to construct the pit, including lining and base.
Labor
Ideally, there should be at least two laborers to dig the pit.
If the pit lining or base is wood, one worker should have some carpentry skills; if the lining or base is brick or concrete block, one worker should have some masonry skills; if the base is poured concrete, one worker should have some concrete skills.
If this number of laborers is not available, you can certainly make do with fewer. The person in charge of construction should be present during all stages of construction.
Lining
The material used for the lining, if needed, can be bamboo, logs, poles, boards, bricks, concrete blocks, or select field stones. Use a material that is readily available and that the laborers are familiar with.
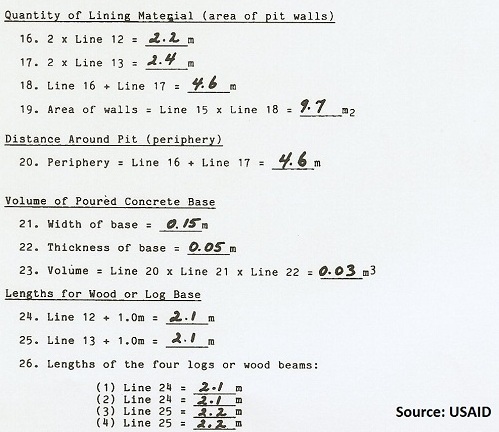
The quantity depends on the type of material and the size of the pit. One way to estimate the quantity is to calculate the area of the pit walls, since the lining must cover nearly the entire wall area except for the spaces between the boards, poles, or bricks.
The area or the pit walls equals two times the width plus two times the length multiplied by the depth (Worksheet A, Lines 16-19).
For example, suppose a pit is 1.1 meters wide, 1.2 meters long , and 2.1 meters deep.
Then the area equals :
(2 x 1.1) + (2 x 1.2) x 2.1
= ( 2.2 + 2.4) x 2.1
= 4.6 x 2.1
= 9.7 square meters
The lining material must cover an area equal to about 9.7 square meters.
Base
The material used for the base can be wood, bricks, concrete blocks, or poured concrete. Use a material that is readily available and that the laborers are familiar with.
Figure 5 shows three different types of bases.
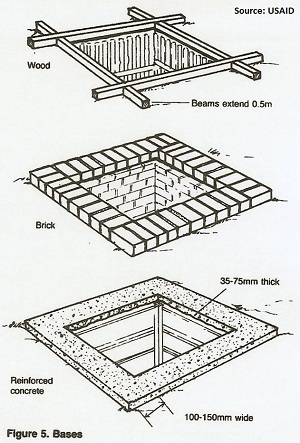
(NOTE: A wood base may not last as long as a bricks concrete block, or poured concrete base.)
The quantity depends on the type of material and the size of the pit.
One way to estimate the quantity for a brick, concrete block, or poured concrete base is to calculate the distance around the top of the pit.
This distance is called the periphery; it is equal to twice the length plus twice the width (Worksheet A, Line 20).
For a base made of bricks or concrete blocks, there must be a sufficient quantity to place the bricks or blocks side by side for a distance equal to the periphery of the pit.
For example, suppose a brick base is needed for a pit 1.1 meters wide and 1.3 meters long. Then the periphery equals:
(2 x 1.1) + (2 x 1.3)
= 2.2 + 2.4
= 4.6 meters
There must be enough bricks to be placed side by side around a periphery or 4.6 meters.
For a poured concrete base, the quantity of poured concrete is equal to the periphery of the pit times the width of the base times the thickness of the base (Worksheet A, Lines 21-23).
For example, suppose a concrete base 0.15 meters wide and 0.05 meters thick is needed for a pit with a periphery of 4.6 meters.
Then the quantity of concrete equals:
4.6 x 0.15m x 0.05m
= 0.03 square meters
For a wood base, four logs or sturdy wooden beams are needed, one for each side of the pit.
Each log should be 1 meter longer than the side of the pit on which it will be laid as shown in Figure 5 (Worksheet A, Lines 24-26).
For example, suppose a wood base is needed for a pit that is 1.2 meters wide and 1.3 meters long.
Then the lengths of the four logs would be:
(1.2+1.0), (1.2+1.0), (1.3+1.0), (1.3+1.0)
= 2.2m, 2.2m, 2.3m, 2.3m.
Tools
The tools required will vary according to the type of pit lining and base. All types of pits require at least two shovels (one per laborer) or other digging implements.
A wheelbarrow is useful for carting away excavated dirt and for bringing other material to the pit site. A saw and nails are needed if the lining or base is made of wood, logs or boards.
If the lining or base is made of bricks or concrete blocks, or the base is made of poured concrete, a container for mixing the concrete or mortar and a trowel for applying and smoothing concrete or mortar are needed.
Also needed are a measuring tape to help determine the exact location of the pit, and wooden stakes or sticks to lay it out on the ground.
A plumb line (long string with a rock tied to the end) will be useful to ensure that the pit walls are dug vertically.
A sturdy rope or ladder should be available for the laborers to get into and out of the pit.
Cost
The cost of the pit depends on a number or variables: which materials are available and which must be purchased; how much labor will be volunteered and how much must be paid for; prices and wage rates; and so on.
Make your best estimate based on local conditions.
When all calculations, determinations, and estimates have been made, prepare a materials list similar to Table 3, and give it to the construction supervisor. In summary, give the construction supervisor:
(1) a location map similar to Figure 1, showing the location of the pit in relation to all nearby structures and geographical features;
(2) a technical drawing similar to either Figure 2 or Figure 3, depending on the type of pit latrine showing correct dimensions of the pit;
(3) sketches similar to those in Figure 4 and Figure 5, showing the general configuration of the pit lining and base; and
(4) a materials list similar to Table 3 showing the labor, materials, tools, and money needed to construct the pit, lining, and base.
Return to "Introduction to Sanitation Facilities, Part 2" from "Privy Pit"