A Compost Toilet is Fairly Easy to Build, Does Not Require a Pit, and Produces Useful Organic Materials
Compost Toilet Design
A composting toilet consists of a pair of waterproof vaults that receive excreta, ashes, sawdust, straw, and grass.
Each vault is equipped with a slab for defecating, a rear opening for removing compost, and a hole for a vent pipe.
Note: The content on this page has been adapted from tech notes entitled “Water for the World” published by USAID.
Designing a composting toilet involves selecting a location, calculating the size of the vaults, and determining the labor, materials, and tools needed for construction. The products of the design process are:
(1) a location map,
(2) design drawings of the compost toilet, and
(3) a materials list.
These products should be given to the construction foreman before construction begins.
This web page describes how to design a compost toilet and arrive at these three end-products.
Location
The compost toilet should be on fairly level ground and at least:
• 6m from the nearest dwelling,
• 6m from the nearest water supply,
• 3m from the nearest property line.
Select a site that allows easy access to the toilet for use and for removing compost. If possible, the site should be downwind from the dwelling as there will be an odor.
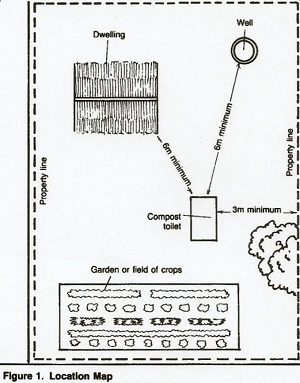
When the site has been selected, draw a location map similar to Figure 1.
Such a drawing should show correct distances from the compost toilet to dwellings, water supplies, property lines, and roads.
Give this map to the construction foreman before construction begins.
General Design Information
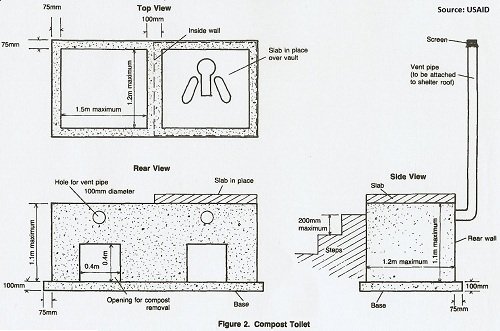
A double-vault compost toilet is usually made from reinforced concrete or brick and mortar, and it rests on a base of similar material. See Figure 2.
The vaults must be waterproof. If they are made from brick and mortar, the inside walls should be coated with a 12-25mm thick coating of cement plaster.
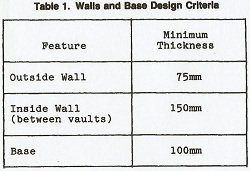
The minimum thickness of the walls and base are shown in Table 1.
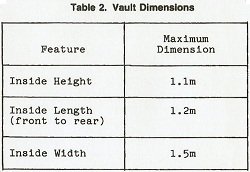
Design the vaults to be the same size. The maximum dimensions of each vault are shown in Table 2.
The rear wall of each vault must have an opening at least 0.4m by 0.4m for removal of compost, and a hole about 100mm in diameter for a vent pipe.
The openings must have wood or metal covers that are larger than the openings themselves. The covers should be braced.
The vent pipes are generally 100mm in diameter and made of galvanized metal.
The compost toilet may have two vent pipes which are permanently installed, or one vent pipe which is moved to whichever vault is in use.
The vent hole in the vault not in use must be covered with wood or metal.
Design the steps leading up to the compost toilet so that the maximum height of each step is 200mm. See Figure 2.
Design the slab so that it is flush with the outside walls of the compost toilet. For details, see "Pit Latrine Sab Design".
Calculating Size
Volume
Each vault must be large enough so that it takes about one year to become 3/4 full.
Each person produces about 0.2 cubic meters of waste per year, taking into account volume reduction to excreta and grass clippings by bacterial action.
This number is multiplied by 1.33 because the vault is filled with soil and sealed when it becomes 3/4 full. Therefore, the volume factor equals:
0.2 cubic meters x 1.33 = 0.27 cubic meters per person
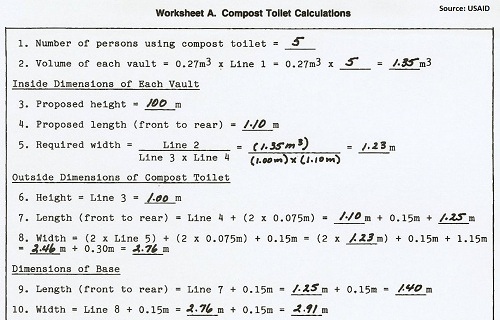
To calculate the required volume of each vault, multiply the volume factor times the number of persons using the compost toilet.
For example, if the toilet is to serve a family of five, the volume of each vault must be five times 0.27 cubic meters:
5 x 0.27 cubic meters = 1.35 cubic meters (Worksheet A, Lines 1-2).
Because of the limitations on dimensions shown in Table 2, this type of compost toilet will serve a maximum of seven persons.
If eight or more persons must be served, design more than one toilet.
Inside Dimensions of Each Vault
Determine the inside dimensions of each vault based on the required volume and on the information in Table 2.
The volume equals the inside height times the inside length times the inside width.
For example, if the required volume of each vault is 1.35 cubic meters, the inside dimensions could be:
1.00m (height) x 1.10m (length) x 1.23m (width) = 1.35 cubic meters (Worksheet A, Lines 3-5).
Outside Dimensions of Toilet
The outside dimensions of the toilet depend on the inside dimensions of each vault and on the information in Table 1.
The outside height equals the inside height.
The outside length (front to rear) equals the inside length plus two times the outside wall thickness.
The outside width equals two times the inside width plus two times the outside wall thickness plus the thickness of the inside wall between the vaults.
For example, if the inside dimensions of each vault are:
height = 1.00m,
length = 1.10m,
width = 1.23m,
then the outside dimensions of the compost toilet are:
outside height = l.00m;
outside length = l.10m + (2 x 0.075m) = 1.10m + 0.15m = 1.25m;
outside width = (2 x 1.23m) + (2 x 0.075m) + 0.15m = 2.46m + 0.15 + 0.15m = 2.76m (Worksheet A, Lines 6-8).
Dimensions of Base
The dimensions of the base are as follows:
length (front to rear) = toilet length plus 0.15m.
width = toilet width plus 0.15m.
This leaves a 75mm area around the base to support the privy shelter. For example, if the outside dimensions of the toilet are:
length = 1.25m, width = 2.76m,
then the dimensions of the base are:
length (front to rear) = 1.25m + 0.15m = 1.40m,
width = 2.76m + 0.15m = 2.91m (Worksheet A, Lines 9-10)
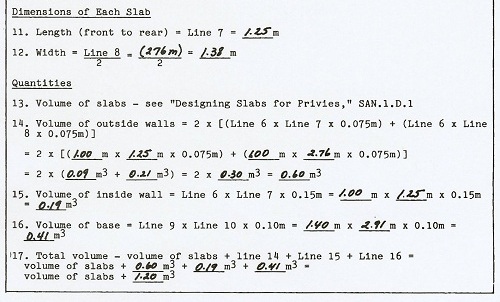
Dimensions of Slabs
Each vault is covered with a squatting or sitting slab. For design criteria, see "Pit Latrine Slab Design".
The outside dimensions of each slab are as follows:
length (front to rear) = compost toilet length;
width = compost toilet width divided by two.
For example, if the dimensions of the toilet are:
length = 1.25m,
width = 2.76m,
then the dimensions of the slab are:
length = 1.25m
width = 2.76m = 1.38m (worksheet A, Lines 11-12).
When all dimensions have been calculated, draw up a plan view similar to Figure 2 showing correct inside and outside dimensions.
Give this drawing to the construction foreman before construction begins.
Determining Materials, Tools, and Labor
The walls and base of a compost toilet are made of reinforced concrete or brick and mortar. The slab is made from reinforced concrete.
Concrete walls and base require cement, sand, gravel, and water; containers and tools for mixing and smoothing concrete; reinforcing materials; wood, hammer, saw, and nails for building forms; and at least one worker with some experience with concrete.
See "Making Concrete" for complete details and specifications on concrete ingredients and reinforcing materials.
Brick and mortar walls and base require bricks or concrete blocks; cement, sand, and water for mortar and cement plaster; containers and tools for mixing and spreading mortar; and at least one worker with some experience with concrete.
A concrete slab requires the same materials, tools, and workers as for concrete walls and base.
Quantities
The quantities of materials needed can be estimated by adding the volumes of the slabs, outside walls, inside walls, and base.
Volume of slabs: see "Pit Latrine Slab Design" .
Volume of outside walls = 2 x [(length x height x thickness) + (width x height x thickness)].
Volume of inside wall = height times length times wall thickness (0.15m).
Volume of base = base length times base width times base thickness (0.10m).
For example, if the outside dimensions of the compost toilet are:
height = 1.00m,
length = 1.25m,
width = 2.76m,
base length = 0.40m,
base width = 2.91m,
then the approximate volume of materials equals:
volume of slabs + volume of outside walls =
2 x [(1.25m x 1.00m x 0.075m) + (2.76m x 1.00m x 0.075m)] = 2 x (0.094 + 0.207) = 0.60 cubic meters
+ volume of inside wall = l.00m x 1.25m x 0.15m = 0.19 cubic meters
+ volume of base = 1.4m x 2.91m x 0.10m = 0.41 cubic meters.
Total volume equals:
volume of slabs + 0.60 cubic meters + 0.19 cubic meters + 0.41 cubic meters =
volume of slabs + 1.20 cubic meters (Worksheet A, Lines 13-17).
When all materials, tools, and labor requirements have been determined, draw up a materials list and give it to the construction foreman before construction begins.
In summary, give the construction foreman a location map similar to Figure 1, design drawings similar to Figure 2, and a materials list.
Compost Toilet Construction
Constructing a compost toilet involves assembling all necessary labor, materials, and tools; building a base and double vault from concrete or brick and mortar; and installing vent pipes, covers for the rear openings, and a pair of slabs.
With careful maintenance, a properly constructed compost toilet can last 10-20 years or more.
Materials Needed
The project designer must provide three papers before construction can begin:
(1) A location map similar to Figure 1.
(2) Design drawings similar to Figure 2.
(3) A detailed materials list similar to Table 1, showing all necessary labor, supplies, and tools.
Construction Steps
Depending on local conditions, availability of materials, and skills of workers, some construction steps will require only a few hours, while others may take a day or more.
Read the construction steps and make a rough estimate of the time required for each step. Draw up a work plan similar to the sample shown in Table 2.
You will then have an idea of when specific laborers, materials, and tools must be available during the construction process.
For a concrete compost toilet:
1. Assemble all laborers, materials, tools and drawings needed to begin construction. Study all drawings carefully.
2. Prepare the site shown on the location map by removing vegetation and rocks and raking the ground smooth.
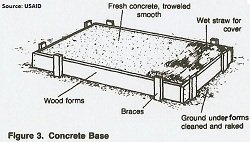
Build forms for the base. See Figure 3. 3. Mix the concrete to the correct proportions.
A common mix by volume is one part cement to two parts sand to three parts gravel and enough water to make a fairly stiff mix.
Mix until sand and gravel are evenly coated with cement and water.
4. Pour in concrete until the forms are about half full, lay in reinforcing material (steel rods, wire mesh, bamboo strips, or equivalent), and pour concrete until the forms are full.
Smooth the surface with a trowel.
5. Cover the fresh concrete with wet straw, burlap bags, or equivalent and keep moist for three to seven days. See Figure 3.
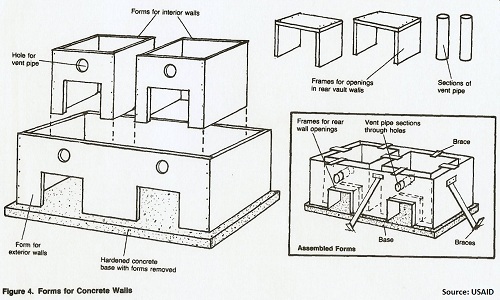
6. Remove the cover material and forms from the base. Build forms for the vault walls.
Build an opening in the rear wall of each vault for compost removal. Set a section of vent pipe into the rear forms for installation of the vents.
Secure reinforcing material in place inside the forms. Brace the forms to be certain that they hold together when the concrete is poured. See Figure 4.
7. Pour concrete into the wall forms. The concrete must completely fill the forms.
Use a steel rod or stout stick to work concrete between the reinforcing materials and the forms.
Smooth the tops of the walls with a trowel. See Figure 5a.
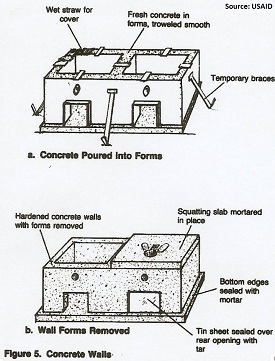
8. Cover the fresh concrete with wet straw, burlap bags, or equivalent and keep moist for three to seven days.
9. Remove the cover material and forms from the walls. Seal the bottom edges of the walls, inside and outside, with cement mortar made with one part cement to three parts sand and enough water to make a workable mix.
10. Cover the rear openings and seal with tar or equivalent. Be sure that the cover is several inches larger than the opening and that the opening is flush on all sides.
This will help ensure the tar seal is strong enough to hold the weight of the accumulating compost.
Do not use cement to seal the covers because eventually they will have to be removed. The covers may also need to be braced.
11. Mortar the squatting or sitting slabs in place. See Figure 5b.
12. Build steps leading up to the toilet. Use bamboo, wood, bricks, or other local material. Be certain each step is no higher than 200mm.
13. Build a shelter, see "Privy Shelter Construction" .
14. Install the vent pipes and secure them to the rear wall or roof of the shelter. See Figure 6.
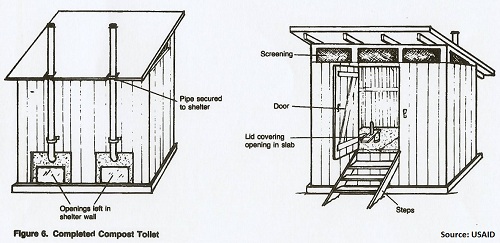
15. Build a heavy lid to cover one squatting slab hole to prevent its use until the proper time.
The lid can be concrete, or it can be wood or metal with a heavy rock on top. Set the lid in place.
For a brick and mortar compost toilet:
1. Assemble all laborers, materials, tools, and drawings needed to begin construction. Study all drawings carefully.
2. Prepare the site shown on the location map by removing vegetation and rocks and raking the ground smooth.
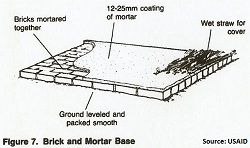
3. Build the base from bricks and mortar. A common mortar mix is one part cement to three parts sand and enough water to make a workable mix.
4. Plaster the top of the base with a 12-25mm thick layer of cement mortar.
Smooth with a trowel, cover with wet straw, burlap bags or equivalent, and keep moist for one to three days. See Figure 7.
5. Remove the cover material and begin laying up the walls, including the wall between the vaults. Build and install frames for the rear wall openings
Rust-proof metal is the best frame material, but wood, bamboo, or other local material can be used. See Figure 8.
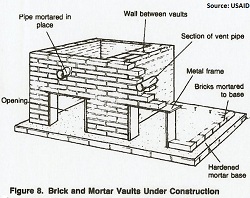
6. When the walls are 200-300mm short of their designed height, mortar sections of the vent pipe in place, lay bricks around the sectional and continue laying up the walls to their designed height. See Figure 8.
7. Fill in any holes or openings in the top course of bricks with cement mortar. Allow one to three days for the walls to set.
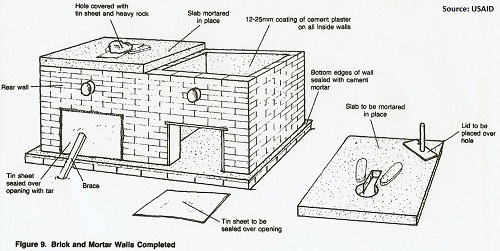
8. Coat the insides of the walls with 12-25mm of cement plaster. Seal the bottom edges of the walls inside and outside, with cement plaster. See Figure 9.
9. Follow steps 11-15 for a concrete compost toilet. See Figure 6.
Return to "Introduction to Sanitation Facilities, Part 2" from "Compost Toilet"