How to Build a Privy Shelter That Provides Privacy, Security, and Dignity
Want to know how to build a privy shelter? A privy shelter is a screen or structure that provides the person using the privy privacy, security, and dignity.
Note: The content on this page has been adapted from technical notes published by USAID, entitled “Water for the World”.
Depending on the design, a shelter can protect the user from the weather and keep out flies, rats, scavenging dogs, and other pests.
Knowing how to build a privy shelter involves assembling necessary labor, materials, and tools; building the shelter to the dimensions specified by the project designer; and building any special features.
A properly constructed shelter can last 5-10 years or more. This webpage describes how to build a privy shelter.
How to Build a Privy Shelter: Materials Needed
The project designer must provide three papers before construction can begin:
1. A plan view of the shelter similar to one or more of Figures 1-4, and 8a and 8b shown in "Privy Shelter Design" , that indicate correct dimensions for how to build a privy shelter.
2. A detailed view of any special features similar to one or more of Figures 5-7 shown in "Privy Shelter Design" .
3. A detailed materials list showing all necessary labor, supplies and tools.
After the project designer has given you these documents concerning how to build a privy shelter, begin assembling the necessary laborers, supplies, and tools.
How to Build a Privy Shelter: The Construction Steps
Depending on local conditions, availability of materials, and skills of workers, some construction steps will require only a few hours, while others may take a day or more.
Draw up a work plan with rough time estimates based on local conditions showing how to build a privy shelter. You will then have an idea of when specific workmen, suppliers, and tools must be available during the construction process.
How to Build a Privy With a Simple Screen Shelter
1. Assemble all laborers, supplies, tools, and drawings needed to begin construction. Study all drawings about how to build a privy shelter.
2. Cut corner posts of uprights to the correct lengths.
3. Set corner posts of uprights firmly in the ground in a vertical position around the privy slab to a depth of 0.3-0.6m as shown in Figure 9a. Thoroughly tamp the ground after the posts are in place.
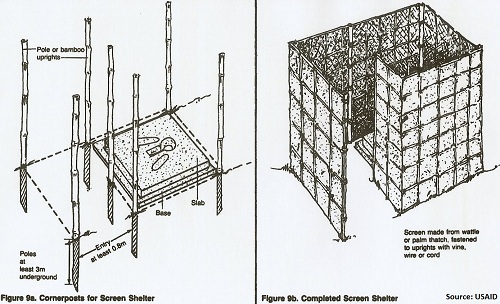
4. Build or weave together the screening material and secure it to the corner posts with vine, wire, or equivalent.
Begin at the end corner post and work your way around the screen. The screen should touch the ground and be as high as the tops of the corner posts as shown in Figure 9b.
How to Build a Privy That has a Bamboo Shelter With Roof or Roof and Door
1. Assemble all laborers, supplies, tools, and diagrams needed to begin construction. Study all diagrams concerning how to build a privy shelter.
2. Build a foundation around the privy slab from bamboo poles 50-100mm in diameter. Notch the ends of the poles, fit them together, and tie them with wire or vine: as shown in Figure 10a.
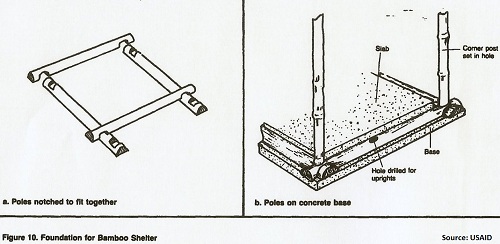
3. Drill or cut holes in the foundation for the corner posts and uprights. Erect the posts: making sure they are vertical, and secure them to the foundation with wire or vine.
Leave at least 0.8m space for the entryway or doorway. See Figure 10b. For a shelter with a door, the corner post and upright on each side of the doorway serve as the door frame.
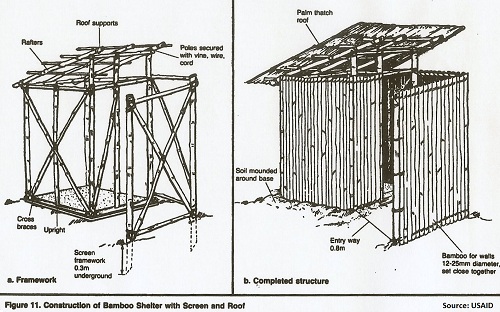
4. Secure the crosspoles to the corner posts with wire or vine. The top crosspoles should be placed at the designed height of the walls.
If the roof is raised for ventilation, the top crosspoles will be 100-150mm below the tops of the corner posts. For a shelter with a door, one crosspole will define the top or the doorway, which should be at least 2.0m high.
5. Secure the rafters to the corner posts with wire or vine. Rafters should extend about 0.3m beyond the front and rear walls.
6. Begin the screening wall, if there is one, by erecting two uprights as shown in Figure 11a. Bury the ends at least 0.3m in the ground and thoroughly tamp. Secure the crosspoles to the uprights.
7. Build the shelter walls and screening wall with bamboo, as shown in Figure 11b. Secure the bamboo to the crosspoles and uprights with wire or vine.
8. Build the roof with bamboo strips and palm thatch, as shown in Figure 11b. Start at the lower edge of the roof and work toward the higher edge, overlapping the thatch or palm leaves. The roof should extend about 0.3m beyond all walls.
9. Build a door, if there is one, with bamboo as shown in Figure 12. Attach the hinges, fasten the door to the door frames and attach a latch, as described in the section on building special features.
10. If the shelter has a door and is to be made fly-proof, cover all ventilation openings with screens, as described in the section on building special features.
11. Mound soil around the bottom of the walls to help keep out pests.
How to Build a Privy That Has a Wood Shelter With a Roof or Roof and Door
1. Assemble all laborers, supplies, tools, and diagrams needed to begin construction. Study all diagrams carefully concerning how to build a privy shelter.
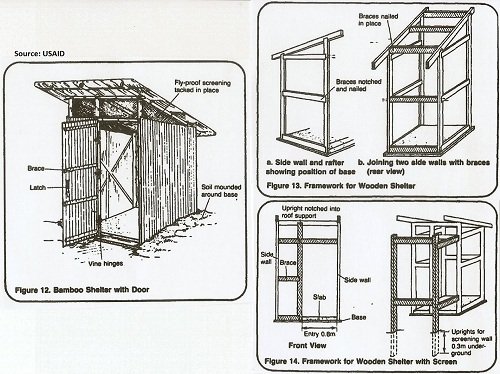
2. Build a foundation around the privy slab from wood beams 50-100mm in diameter as shown in Figures l3a and l3b.
3. Erect the corner posts and uprights, making sure they are vertical, and nail them securely to the foundation. Leave at least 0.8m space for the entryway or doorway, as shown in Figure 14.
For a shelter with a door, the corner post and upright on each side of the doorway serve as the door frame.
4. Nail crossbraces to the inside edges or the corner posts and uprights. The top crossbrace should be at the designed height of the walls.
If the roof is to be raised for ventilation, the top crossbraces will be 100-150mm below the tops of the corner posts.
For a shelter with a door, one crossbrace will define the top of the doorway, which should be at least 2.0m high.
5. Nail the rafters on top of the cornerposts. The rafters should extend about 0.3m beyond the shelter walls.
6. Begin the screening wall, if there is one, by erecting two uprights as shown in Figure 14. Bury the ends 0.3-0.6m in the ground and thoroughly tamp. Nail crossbraces to the inside edges of the uprights.
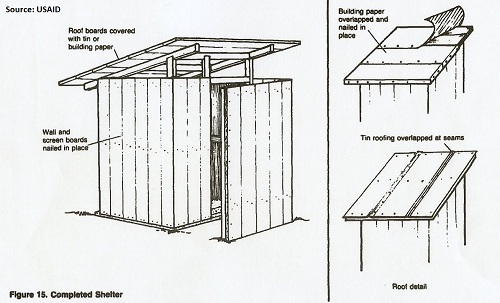
7. Build the walls and screening wall by nailing boards to the outside edges of the corner posts and uprights, as shown in Figure 15.
8. Build the roof by nailing crosspieces to the rafters, then nailing tin sheets to the crosspieces. Start from the lower edge of the roof and work toward the higher edge overlapping the tin sheets as shown in Figure 15. The roof should extend about 0.3m beyond all walls.
9. Build a door, if there is one, with wood boards as shown in figures 3 and 5. Attach the hinges, fasten the door to the door frame, and put on a latch as described in the section on building special features.
10. If the shelter has a door and is to be made fly-proof, cover all ventilation openings with screens as described in the section on building special features.
11. Mound soil around the bottom of the walls to help keep out pests.
How to Build a Privy That Has a Brick and Mortar Shelter With a Roof or Roof and Door
Since brick and mortar shelters should stand for more than 10 years, they are recommended for use both off-set pit privies and compost toilets, which generally last that long.
Because of the weight of brick and mortar shelters, they are not recommended for use with ventilated pit privies in which the back wall or the privy rests on the privy slab.
1. Assemble all laborers, supplies, tools, and diagrams needed to begin construction. Study all diagrams carefully concerning how to build a privy shelter.
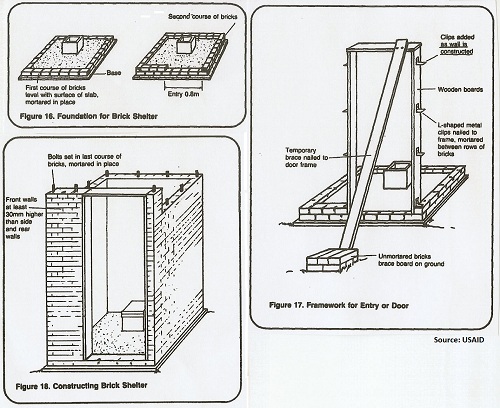
2. Mortar a row of bricks to the base of the pit, mortaring the inside edge of the bricks to the privy slab.
3. Mortar a second row of bricks overlapping the first row as shown in Figure 16. Leave at least 0.8m space for the entry.
4. For a shelter with a door, build the door frame with wood beams 50mm thick by 100mm wide, and set it in place with a temporary brace as shown in Figure 17.
Fasten L-shaped metal strips to each side of the door frame with nails or screws. The horizontal part of the strip will be mortared between the rows of bricks to hold the frame in place.
Attach a second pair of L-shaped strips when the walls reach about half their height and a third pair when the walls reach nearly the total height.
5. Continue laying rows of bricks up to the design height of the walls, being careful to keep the walls vertical.
6. Place bolts about 12mm diameter by at least 100mm long in the top bricks near the corners of each wall as shown in figure 18. Mortar the bolts in place with the threaded ends up.
7. Allow a day or two for the mortar to set. Remove the temporary brace.
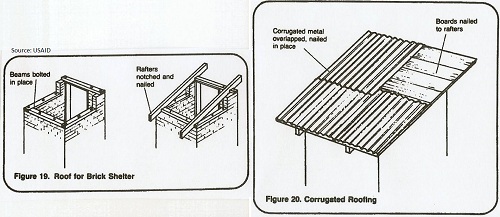
8. Drill or burn holes in wood beams 50mm thick by 100mm wide, matching the size and location of the holes to the bolts sticking up from the bricks. Set these top beams in place and fasten them to the bolts securely using nuts as shown in Figure 19.
9. Nail the rafters to the top beams. The rafters should extend about 0.3m beyond the walls as shown in Figure 19.
10. Build the roof by nailing cross-pieces to the rafters and nailing corrugated metal sheets to the cross-pieces. The furrows in the metal should be lined up in the direction of the roof slope.
Start from the lower edge of the roof and work toward the higher edge, overlapping the corrugated sheets as shown in Figure 20. The roof should extend about 0.3m beyond all walls.
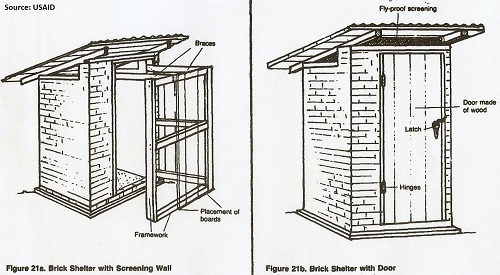
11. Build a screening wall, if there is one, by nailing uprights to the wood beam foundation. Nail the crossbraces to the uprights and to the top beam of the shelter. Nail the boards to the uprights as shown in Figure 2la.
12. Build a door, if there is one, with wood boards as shown in Figure 21b. Attach the hinges, fasten the door to the door frames and put on a latch as described in the section on building special features.
13. If the shelter has a door and is to be made fly-proof, cover all ventilation openings with screen as described in the section on building special features.
How to Build a Privy: Building Special Features
Ventilation Openings
Here's how to build a privy shelter with ventilation. If the roof is not raised above the walls for ventilation, and ventilation openings are desired, cut openings near the tops of the walls. The openings should be about 200mm wide by 100mm high and spaced around the wails about 150mm apart as shown in Figure 6.
Screens
Screens covering ventilation openings must have mesh no larger than 2mm in order to keep out flies. Screens should be made of rust-proof material such as bronze, copper, plastic, or aluminum. If the screens are not rust-proof, paint them to prevent rust.
To cover a ventilation opening, cut a section of screen large enough to overlap the opening by 25mm on all sides and nail it in place as shown in figure 6.
Door Hinges
Before attaching the hinges, hold the door in place and mark the door and the door frame where the hinges should be placed.
Hinges should be about 150mm from the top of the door and 250mm from the bottom. They should be placed so that the door opens outward, if this is culturally acceptable.
If you are using prefabricated metal hinges with removeable pins, remove the pin from each hinge and separate the two halves. Attach one half with screws or nails to the door frame and the other half to the door. Raise the door in place, fit the halves of the hinges together, and reinsert the pin in each hinge.
If you are using a strap hinge, install it on the door. Lift the door into place and use a temporary support to hold it off the floor in its correct position. Accurately mark the proper location of the hinge on the door frame. Take the hinge apart and install the frame half. Then, hang the door.
For hinges of stiff leather such as soles of discarded boots or sandals, nail the hinges to the door, raise the door in place, and nail the hinges to the door frame.
For hinges made of vine, raise the door in place and tie the vine around the bamboo poles of the door and door frame. Leave enough slack so the door can be easily opened and closed.
Door Latch
For an eyelet-and-hook latch, secure the eyelet to the inside of the door frame, and attach the hook to the inside of the door. The latch should be just above the middle of the door.
For a bar latch, nail a piece of wood to the inside of the door. For a peg-and-loop latch, fasten the bamboo peg to the inside of the door frame and tie the vine loop to the inside of the door.
Vent Pipe
The vent pipe is mortared to the vent hole in the privy slab and attached to the shelter roof or the wall, if extra support is needed. The pipe should be vertical.
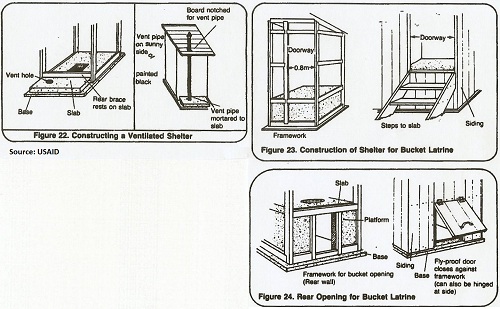
If the roof overhangs the vent hole, cut a hole or notch in the roof to accommodate the vent pipe as shown in Figure 22. Attach the vent pipe to the roof and wall with either a metal band and screws, wood and nails, wire, or vine.
How to Build a Privy Shelter for Off-Set Pit Privy
The foundation for the shelter must rest on the ground and butt up against the platform which supports the privy slab. Level the ground and thoroughly tamp it before building the foundation.
The bottom of the privy walls begin at the foundation and completely enclose the platform. The bottom of the doorway or entryway begins at the privy slab and is higher than the foundation. For additional details see"Privy Slab Construction".
How to Build a Privy Shelter for Bucket Latrine
The foundation for the shelter rests on the platform base and butts up against the platform. Build the shelter walls to completely enclose the platform. The bottom of the entryway is level with the privy slab as shown in Figure 23.
A fly- proof door for removal of the bucket must be built into either the rear of the platform or the rear wall of the shelter. The door should have hinges and a latch to keep it tightly closed.
If the door is built into the platform, leave an opening in the rear shelter wall as shown In Figure 24.
How to Build a Privy Shelter for a Compost Toilet
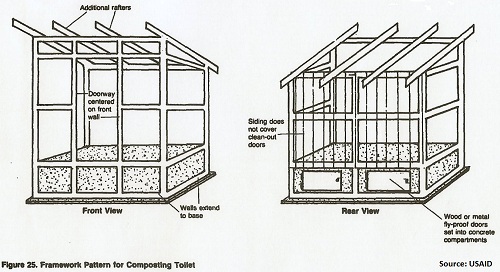
The foundation for the shelter rests on the base of the double vault and butts up against the vault. Build the shelter walls to completely enclose the platform. The bottom of the entryway is level with the privy slab as shown in Figure 25.
Airtight doors will be built into the rear of the vault. Leave openings in the rear shelter wall to allow access to these doors as shown in Figure 25.
Return to "Introduction to Sanitation Facilities, Part 2" from "How to Build a Privy"