Privy Digging Produces a Pit for Collection and Containment of Excreta, Preventing the Spread of Contamination
Privy digging requires some care and only basic tools and manual labor.
Note: The content on this page has been adapted from tech notes entitled “Water for the World” published by USAID.
The pit beneath a privy receives and holds excreta. Privy digging produces a pit that prevents contamination of groundwater and the spread of disease by keeping the excreta away from humans, animals and insects.
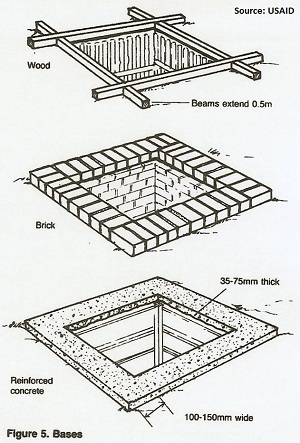
At the top, the pit has a base for the slab. The pit often has a lining, also.
If the pit walls will not stand on their own, a lining prevents them from caving in. Lining is installed after the pit is dug.
Shoring, similar to lining, must be put in place during excavation of deeper pits and pits in crumbly soils to protect workers from cave-ins. The base supports the slab or cover and privy shelter.
Privy digging involves assembling laborers, materials, and tools to do the job, excavating the pit at the correct location, lining the pit walls, if necessary, and building a base for the slab.
A properly constructed pit will last 5 to 10 years. This page describes each step in privy digging.
Materials Needed for Privy Digging
The project designer should provide four items before construction can begin:
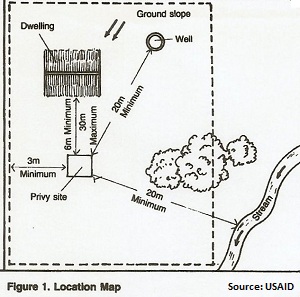
1. A location map, similar to Figure 1, showing the correct site where the privy digging is to take place. The map will show distances from the pit to nearby dwellings, sources of drinking water, property lines, and any other structures or prominent geographical features.
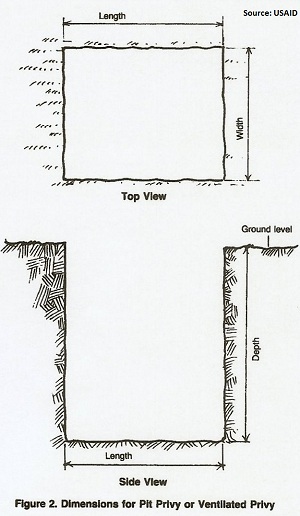
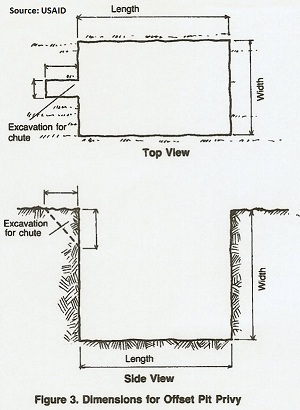
2. Technical drawings, similar to Figures 2 and 3, showing the correct dimensions of the pit.
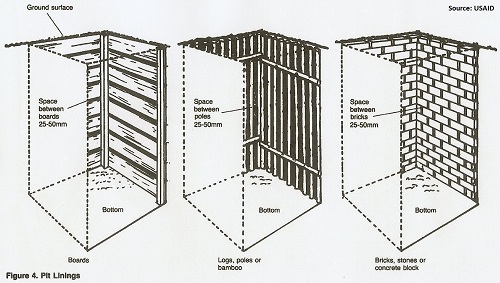
3. Sketches, similar to Figures 4 and 5, showing the materials and general configuration of the pit lining and base.
4. Materials list, describing all labor, supplies, and tools needed for privy digging, lining the pit, and the base of the pit.
You will also need a slab or cover to cover the pit immediately after the base and lining are in place (seePit Latrine Slab Design andPit Latrine Slab Construction).
(NOTE: Figures 1,2 and 3 are samples only and cannot be used for actual privy digging. The documents you need should be provided by project designers or those in charge of the privy digging).
After the project designer has given you these documents carefully begin assembling the necessary workmen, supplies, and tools.
Caution! Privy digging can be dangerous!
1. If the pit is deeper than about 1.5 meters the walls must be shored during excavation to prevent a cave-in that could be fatal to a worker in the pit.
2. Do not hand-dig a pit deeper than about 3.5 meters
3. Privy digging must take place at the exact site and to the dimensions specified by the project designer to protect groundwater and other sources of drinking water.
4. A pit must be covered with a slab or a cover when it is not attended and immediately after it is excavated and the lining and base are in place.
A pit left open and unattended is a serious hazard.
Privy Digging and Construction Steps
Depending on local conditions, availability of materials, skills of workers and so on, some construction steps will take only a few hours, while others may take a day or more.
Draw up a work plan that outlines required tasks and rough time estimates based on local conditions.
You will then have an idea of when specific workmen, supplies and tools must be available during the construction process.
The following are construction steps for building a pit.
1. Assemble all laborers, materials tools, and drawings needed to begin construction. Study all diagrams carefully.
2. Determine the correct location of the pit, using the location map similar to Figure 1 and a measuring tape.
Clear the area of any vegetation that might hinder construction. Lay out on the ground the correct dimensions of the pit, as shown in the technical drawing, and mark each corner of the pit with a wooden stake or pointed stick as shown in Figure 6.
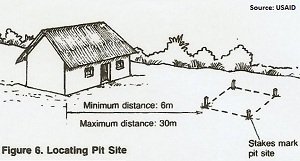
Mark the excavation for the chute, if it is an offset pit.
3. Build the base around the pit site. This is done before digging the pit to prevent the top of the pit walls from crumbling and to ensure that the slab or cover can be put in place immediately after the pit is dug and lined.
The corners of the base should be square.
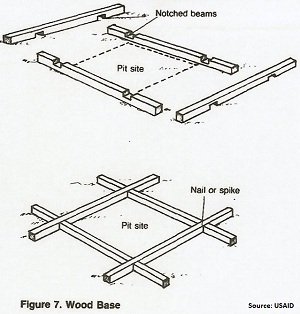
For a wood base:
3a. Cut four logs, poles, or wood beams to the length determined by the project designer.
Cut two notches halfway through each log as shown in Figure 7, so the logs will fit together to form the base around the pit site.
Bind the logs with heavy cord or twine or nail them together.
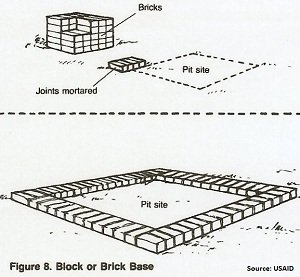
For a concrete block or brick base:
3b. Lay a straight row of bricks or blocks along each side of the pit site as shown in Figure 8.
The blocks should either be mortared together or fit tightly. Tamp the blocks in place or scrape away dirt to ensure that the rows of blocks are level.
If the blocks or bricks are mortared together, cover them with damp straw, leaves, or grass and allow a few days for the mortar to set. Keep the cover material damp until the concrete has set.
For a poured concrete base:
3c. Dig a shallow, level trench around the pit site. Make the trench about 150mm wide and 50 to 75mm deep as shown in Figure 9. The width and depth of this trench determine the width and thickness of the base.
The trench lines should be straight, the bottom tamped, and the sides and bottom clean and free or loose dirt.
Mix the concrete and pour it evenly around the trench until the trench is about half full. Lay reinforcing material such as steel bars, wire mesh, or bamboo in place. Pour concrete until the trench is full.
Smooth the surface with a trowel. Cover with wet straw, leaves, grass, burlap, or other material and allow three to seven days for the concrete to set.
Keep the cover material damp until the concrete has set.

4. Begin digging the pit after the base has been constructed and is securely in place.
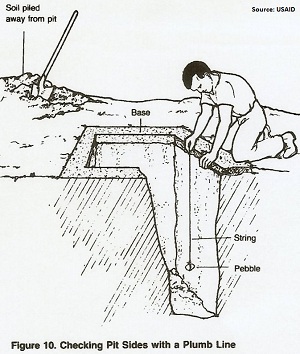
Make the sides straight and smooth Use a plumb line (string tied to rock or weight) to check the sides during excavation, as shown in Figure 10.
Pile the dirt at least 1m away from the edge of the pit to prevent it from falling back in.
For an offset pit, make the additional small excavation for the chute.
NOTE: Depending on the dimensions of the pit, it is likely that there will be space for only one laborer to dig. Have laborers rotate every 20 to 40 minutes- one in the pit. one or two outside.
When the pit reaches about shoulder level, it may be helpful to lower a bucket or box tied to a rope into the pit.
The laborer in the pit can fill the container with dirt, and the laborer outside can haul the full container up and out.
This method of excavation will be necessary for pits deeper than about 1.5m.
Have a sturdy rope or ladder readily available for laborers to get in and out of the pit.
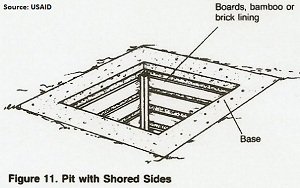
5. Shore up the sides of the pit to prevent possible cave-ins when excavating deeper than about 2m as shown in Figure 11.
Secure the sides with logs, poles, boards, bamboo, or other material when the depth reaches about 2m.
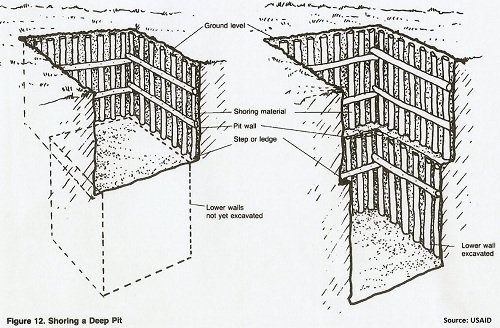
Continue digging, leaving a 75 to 100mm step or ledge around the walls to support the shoring material as shown in Figure 12.
Shore up the lower walls when the pit reaches the correct depth.
Do not hand dig a pit deeper than about 3.5m.
6. Measure the depth repeatedly during privy digging. Make the pit floor fairly level when the correct depth has been reached.
7. Install the lining, if needed, after privy digging is complete and the pit is fully excavated. The lining should extend from the bottom of the pit to the base.
If the pit has been shored, the shoring material can be left in place and serve as the lining.
For a log, pole, or bamboo lining:
7a. Cut logs or poles to a length equal to the depth of the pit. Place the logs or poles vertically along the sides of the pit.
The poles should reach from the bottom of the pit to the base and should be placed 25 to 75mm apart.
Cut four cross poles equal to the length of the pit, and four cross poles equal to the width.
Nail or tie the cross poles in place about 0.5m from the top and bottom of the pit walls to secure the vertical poles, as shown in Figure 4.
For a wood or board lining:
7b. Place the boards either vertically or horizontally. To place them vertically, use the same methods as for log, pole, or bamboo linings.
To place them horizontally, cut boards to lengths equal to both the length and width of the pit.
Cut four long boards or beams to a length equal to the depth of the pit.
Put a long board or beam in each corner of the pit and place the shorter side boards horizontally along the pit walls and nail them to the corner beams.
The side boards should be spaced about 25 to 75mm apart, as shown in Figure 4.
For a concrete block or brick lining:
7c. Stack the blocks or bricks up the sides of the pit as shown in Figure 4. Leave spaces between the bricks.
Do not mortar. Stack the bricks up to the base. For additional strength, mortar the top two courses of bricks.
8. Remove any tools used in privy digging, equipment, or scrap material from the pit after the lining is in place.
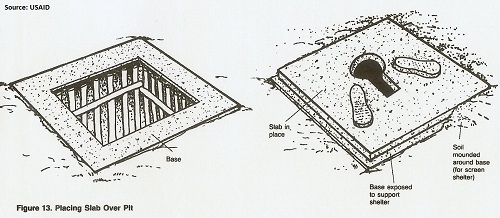
9. Set the slab or cover in place over the pit as shown in Figure 13. If the slab or cover is in sections, use tar, oakum or other material to waterproof where the sections fit together.
10. Waterproof around the edges of the slab or cover where it rests on the base.
Do not mortar the slab or cover to the base because in 5 to 10 years, depending on the size of the pit, the slab or cover will be moved to a new pit.
11. Place dirt around the edges of the base and slab or cover, and tamp.
This dirt will help seal the pit.
12. Set or build in place a privy shelter.
13. Place dirt around the edges of the shelter, and tamp.
Return to "Introduction to Sanitation Facilities, Part 2" from "Privy Digging"