Using Bentonite Mud as a Drilling Fluid Requires That You Manage Its Viscosity and Flow in Mud Pits, Allowing Cuttings to Drop Out.
Using Bentonite and the Mud Pits
Once the bentonite mud has been fully hydrated, a portion of the very thick mud that has been mixed in a 55-gallon drum (or large trash can) may be used to coat the sides and seal the bottom of the mud pits if the soil is very porous.
Using bentonite mud in this way is better than lining the pits with plastic or some other material.
This can be done as the mud pits are being filled with water.
Start with the suction pit, and when it is full and the thick mud has mixed with the water, begin using bentonite mud to fill the settling pit.
When the pits are nearly full, measure the viscosity of the drilling mud and use bentonite, fully hydrated, to add to the mud to reach the viscosity needed for the soil that is being drilled (see the table in the previous lesson).
It will usually be necessary to mix several 55-gallon drums (or large trash cans) using bentonite that is very thick before the pits are full and the drilling mud is ready to use.
Once drilling begins, keep a 55-gallon drum (or large trash can) full of very thick hydrated bentonite so it is ready to add to the drilling fluid whenever needed.
Using Bentonite: Things to Remember and Things to Watch Out For
ALWAYS using bentonite that is newly hydrated, add it to the bucket around the suction hose. This ensures that it will be thoroughly mixed with the existing drilling mud.
NEVER add clear water to the suction bucket, since this will quickly lower the viscosity of the drilling mud in the borehole and cause cuttings to drop out around the drill bit.
To gradually thin the drilling mud, add water to the front of the settling pit so the water has time to mix with the existing drilling mud.
As the drill bit advances through different formations (types of soil) it may necessary to change the viscosity of the drilling fluid.
Watch these four things:
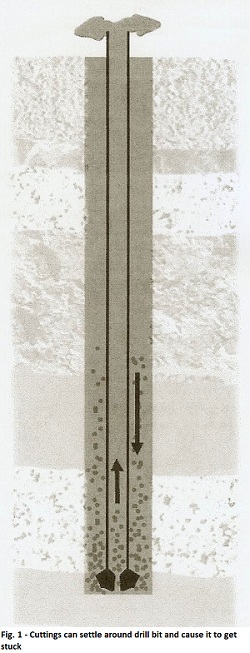
1. Get the Cuttings Out: Watch when the quill is disconnected to add another section of drill pipe. If drilling mud flows out of the top of the drill pipe, then the drilling mud is too thin.
When the drilling mud in the borehole is full of cuttings, it is heavier (more dense) than the drilling mud inside the drill pipe. Therefore, the mud outside the pipe pushes up on the mud inside the pipe, causing it to flow out.
This is a dangerous situation!
When you see mud flowing out of the drill pipe, two things are happening:
1. Cuttings are settling around the drill bit, which could cause it to get stuck and be unable to rotate.
2. Cuttings are flowing up into the drill pipe where they could plug the drill bit and prevent circulation.
Take immediate action:
Reconnect the quill and lift the bit off of the bottom of the borehole.
Resume rotation of the bit.
Resume circulation until all cuttings have been flushed out.
Two things contribute to this problem; using bentonite mud that is too thin to lift the cuttings and the drilling mud is not circulated long enough to bring the cuttings to the surface.
See Figure 1.
To clear out the borehole, pour a bucket full of thick hydrated bentonite directly into the bucket around the suction hose.
This is called a "sweep" or a "slug".
Using bentonite in a slug of extra-heavy mud will push out cuttings that are remaining in the borehole. It should not be necessary to do this at every drill pipe change.
2. Maintain Circulation:
If the drilling mud is not circulating at the full capacity of the mud pump, then cuttings will not be effectively removed from the borehole.
The most common cause of reduced circulation is the strainer on the suction hose getting clogged with bits of grass or roots. It takes constant effort to keep the suction strainer clear.
You can't lift the strainer out of the water because that will stop flow completely. So this job has to be done kneeling down on the edge of the suction pit.
At first, the suction may feel like it will hurt your hand, but it won't.
Another reason for circulation to stop is when the mud pump runs out of fuel.
It is a serious problem if this happens during drilling because it could cause the bit to immediately get stuck.
While a new section of drill pipe is being added, check the fuel level in the mud pump. If it needs more fuel, turn off the mud pump and fill the tank.
NEVER add fuel to an engine that is running as it could cause a fire or explosion.
3. Maintain the Fluid Level:
As the borehole gets deeper, it requires more drilling mud to fill it, so additional water and hydrated bentonite periodically needs to be added to the suction pit.
A 30-meter (100') borehole that is 200 mm (8") in diameter holds 900 liters (240 gallons).
When drilling in porous material such as sand or gravel, the drilling fluid may soak into the formation in significant amounts.
This should not happen if a good wall cake has formed, but sometimes a very porous formation will take up a lot of drilling mud before a wall cake can form.
Fluid loss can be so rapid that the suction pit is drained and there is no return flow to bring up cuttings.
If this happens, the drill bit must be raised immediately.
It is helpful to push a small stick into the wall of the suction pit to mark the top of the drilling fluid when drilling begins. This way, it is more obvious when the fluid level begins to drop.
4. Are the Cuttings Settling?
Remember, drilling mud needs to be thick enough to lift cuttings out of the borehole but not so thick that they can't settle out in the mud pits.
The heavier cuttings will drop out in the channel between the rig and the settling pit. But it takes time for the smaller cuttings to drop out of the drilling mud.
If the mud pits are too small, then the mud passes quickly through them and is picked up by the mud pump while the mud still carries cuttings - mostly sand.
This sand damages the mud pump, the hoses, and the fittings. It also can clog the drill bit.
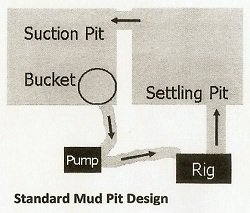
The design of the return channel and mud pits is very important.
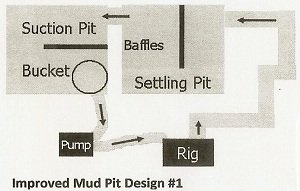
• Lengthen the channel between the drill rig and the settling pit and place baffles in the settling and suction pits.
These measures make longer flow path for the drilling mud and increase the amount of time that cuttings have to settle out. At each change in direction of flow, there will be an accumulation of cuttings.
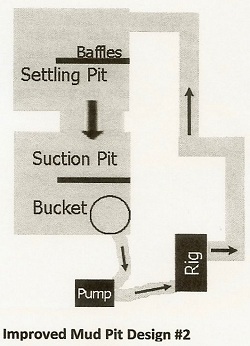
The "standard" mud pit layout is compared with two "improved" designs in the following drawings.
• Adding baffles and lengthening the channel can be done without moving the rig or making changes to the shape or size of the mud pits.
In improved design #2 many of the cuttings will drop out in the bends in the long return channel where they are easy to shovel out.
See the various mud pit designs in the figures below:
Return to "Introduction to Bentonite Clay" from "Using Bentonite"
Return "Home'